1
2
3
4
5
6
7
8
9
10
11
12
13
14
15
16
17
18
19
20
21
22
23
24
25
26
27
28
29
30
31
32
33
34
35
36
37
38
39
40
41
42
43
44
45
46
47
48
49
50
51
52
53
54
55
56
57
58
59
60
61
62
63
64
65
66
67
68
69
70
71
72
73
74
75
76
77
78
79
80
81
82
83
84
85
86
87
88
89
90
91
92
93
94
95
96
97
98
99
100
101
102
103
104
105
106
107
108
109
110
111
112
113
114
115
116
117
118
119
120
121
122
123
124
125
126
127
128
129
130
131
132
133
134
135
136
137
138
139
140
141
142
143
144
145
146
147
148
149
150
151
152
153
154
155
156
157
158
159
160
161
162
163
164
165
166
167
168
169
170
171
172
173
174
175
176
177
178
179
180
181
182
183
184
185
186
187
188
189
190
191
192
193
194
195
196
197
198
199
200
201
202
203
204
205
206
207
208
209
210
211
212
213
214
215
216
217
218
| import os
import random
import math
from PIL import Image, ImageDraw, ImageFont, ImageFilter
class ArtisticCalligrapher:
def __init__(self, main_font_path, seal_font_path, bg_color=(242, 238, 230)):
"""
初始化书法生成器
:param main_font_path: 正文字体路径 (如行书)
:param seal_font_path: 印章字体路径 (如篆体)
:param bg_color: 背景宣纸色 (默认米黄)
"""
self.main_font_path = main_font_path
self.seal_font_path = seal_font_path
self.bg_color = bg_color
def add_paper_texture(self, img):
"""核心算法1:生成宣纸纹理"""
width, height = img.size
draw = ImageDraw.Draw(img)
for _ in range(int(width * height * 0.08)):
x = random.randint(0, width - 1)
y = random.randint(0, height - 1)
color_offset = random.randint(-20, 20)
noise_color = (
max(0, min(255, self.bg_color[0] + color_offset)),
max(0, min(255, self.bg_color[1] + color_offset)),
max(0, min(255, self.bg_color[2] + color_offset))
)
draw.point((x, y), fill=noise_color)
overlay = Image.new('RGBA', img.size, (0,0,0,0))
overlay_draw = ImageDraw.Draw(overlay)
for _ in range(6):
x = random.randint(0, width)
y = random.randint(0, height)
r = random.randint(150, 450)
overlay_draw.ellipse((x-r, y-r, x+r, y+r), fill=(210, 205, 190, 25))
overlay = overlay.filter(ImageFilter.GaussianBlur(60))
img = Image.alpha_composite(img.convert('RGBA'), overlay).convert('RGB')
return img
def create_seal(self, content, size=100):
"""核心算法2:生成仿古印章 (支持篆体)"""
canvas_size = int(size * 1.1)
img = Image.new('RGBA', (canvas_size, canvas_size), (0, 0, 0, 0))
draw = ImageDraw.Draw(img)
seal_color = (175, 35, 35)
rect = [5, 5, size-5, size-5]
for i in range(3):
off_x = random.randint(-1, 1)
off_y = random.randint(-1, 1)
draw.rectangle([rect[0]+off_x, rect[1]+off_y, rect[2]-off_x, rect[3]-off_y],
outline=seal_color, width=random.randint(2, 4))
seal_font_size = int(size * 0.45)
try:
seal_font = ImageFont.truetype(self.seal_font_path, seal_font_size)
except IOError:
print(f"【警告】印章字体加载失败,降级使用正文字体。")
seal_font = ImageFont.truetype(self.main_font_path, seal_font_size)
if len(content) == 2:
char_h = seal_font_size * 0.9
total_h = char_h * 2
start_y = (size - total_h) / 2
w1 = draw.textbbox((0,0), content[0], font=seal_font)[2]
draw.text(((size-w1)/2, start_y), content[0], font=seal_font, fill=seal_color)
w2 = draw.textbbox((0,0), content[1], font=seal_font)[2]
draw.text(((size-w2)/2, start_y + char_h), content[1], font=seal_font, fill=seal_color)
else:
text_bbox = draw.textbbox((0,0), content, font=seal_font)
w = text_bbox[2] - text_bbox[0]
h = text_bbox[3] - text_bbox[1]
draw.text(((size-w)/2, (size-h)/2 - size*0.02), content, font=seal_font, fill=seal_color)
pixels = img.load()
for _ in range(int(size*size*0.15)):
x = random.randint(0, canvas_size-1)
y = random.randint(0, canvas_size-1)
if pixels[x, y][3] > 0:
if random.random() > 0.65:
pixels[x, y] = (255, 255, 255, 0)
return img
def generate(self, text, seal_content, base_font_size=80, output_file="result.jpg"):
"""主生成逻辑"""
char_spacing = int(base_font_size * 1.15)
line_spacing = int(base_font_size * 1.5)
margin = int(base_font_size * 2.5)
canvas_height = 1300
chars_per_col = (canvas_height - margin * 2) // char_spacing
num_cols = math.ceil((len(text) + 1) / chars_per_col)
canvas_width = margin * 2 + num_cols * line_spacing
print("正在编织宣纸纹理...")
img = Image.new('RGB', (int(canvas_width), canvas_height), self.bg_color)
img = self.add_paper_texture(img)
print("正在挥毫泼墨...")
cursor_x = canvas_width - margin - base_font_size
cursor_y = margin
for char in text:
scale = random.uniform(0.92, 1.08)
current_font_size = int(base_font_size * scale)
font = ImageFont.truetype(self.main_font_path, current_font_size)
offset_x = random.randint(-4, 4)
offset_y = random.randint(-4, 4)
ink_val = random.randint(15, 35)
ink_color = (ink_val, ink_val, ink_val)
char_layer = Image.new('RGBA', (int(base_font_size*1.5), int(base_font_size*1.5)), (0,0,0,0))
char_draw = ImageDraw.Draw(char_layer)
char_draw.text((base_font_size*0.25, base_font_size*0.25), char, font=font, fill=ink_color+(240,))
angle = random.uniform(-1.5, 1.5)
char_layer = char_layer.rotate(angle, resample=Image.BICUBIC, expand=0)
paste_x = int(cursor_x + offset_x + (base_font_size - char_layer.width)/2)
paste_y = int(cursor_y + offset_y + (base_font_size - char_layer.height)/2)
img.paste(char_layer, (paste_x, paste_y), char_layer)
cursor_y += char_spacing
if cursor_y > canvas_height - margin - base_font_size*1.2:
cursor_y = margin
cursor_x -= line_spacing
seal_size = int(base_font_size * 1.1)
if cursor_y + seal_size + margin > canvas_height:
cursor_y = margin
cursor_x -= line_spacing
else:
cursor_y += int(base_font_size * 0.6)
seal_img = self.create_seal(seal_content, size=seal_size)
seal_angle = random.uniform(-3, 3)
seal_img = seal_img.rotate(seal_angle, resample=Image.BICUBIC, expand=1)
seal_offset_x = random.randint(-2, 2)
seal_x = int(cursor_x + (base_font_size-seal_size)/2) + seal_offset_x
seal_y = int(cursor_y)
img.paste(seal_img, (seal_x, seal_y), seal_img)
img = img.filter(ImageFilter.SMOOTH_MORE)
img.save(output_file, quality=98)
print(f"✅ 书法作品已生成: {output_file}")
if __name__ == "__main__":
main_font = "brush.ttf"
seal_font = "seal.ttf"
if not (os.path.exists(main_font) and os.path.exists(seal_font)):
print(f"❌ 错误:请确保目录下包含 {main_font} 和 {seal_font}")
else:
artist = ArtisticCalligrapher(main_font, seal_font)
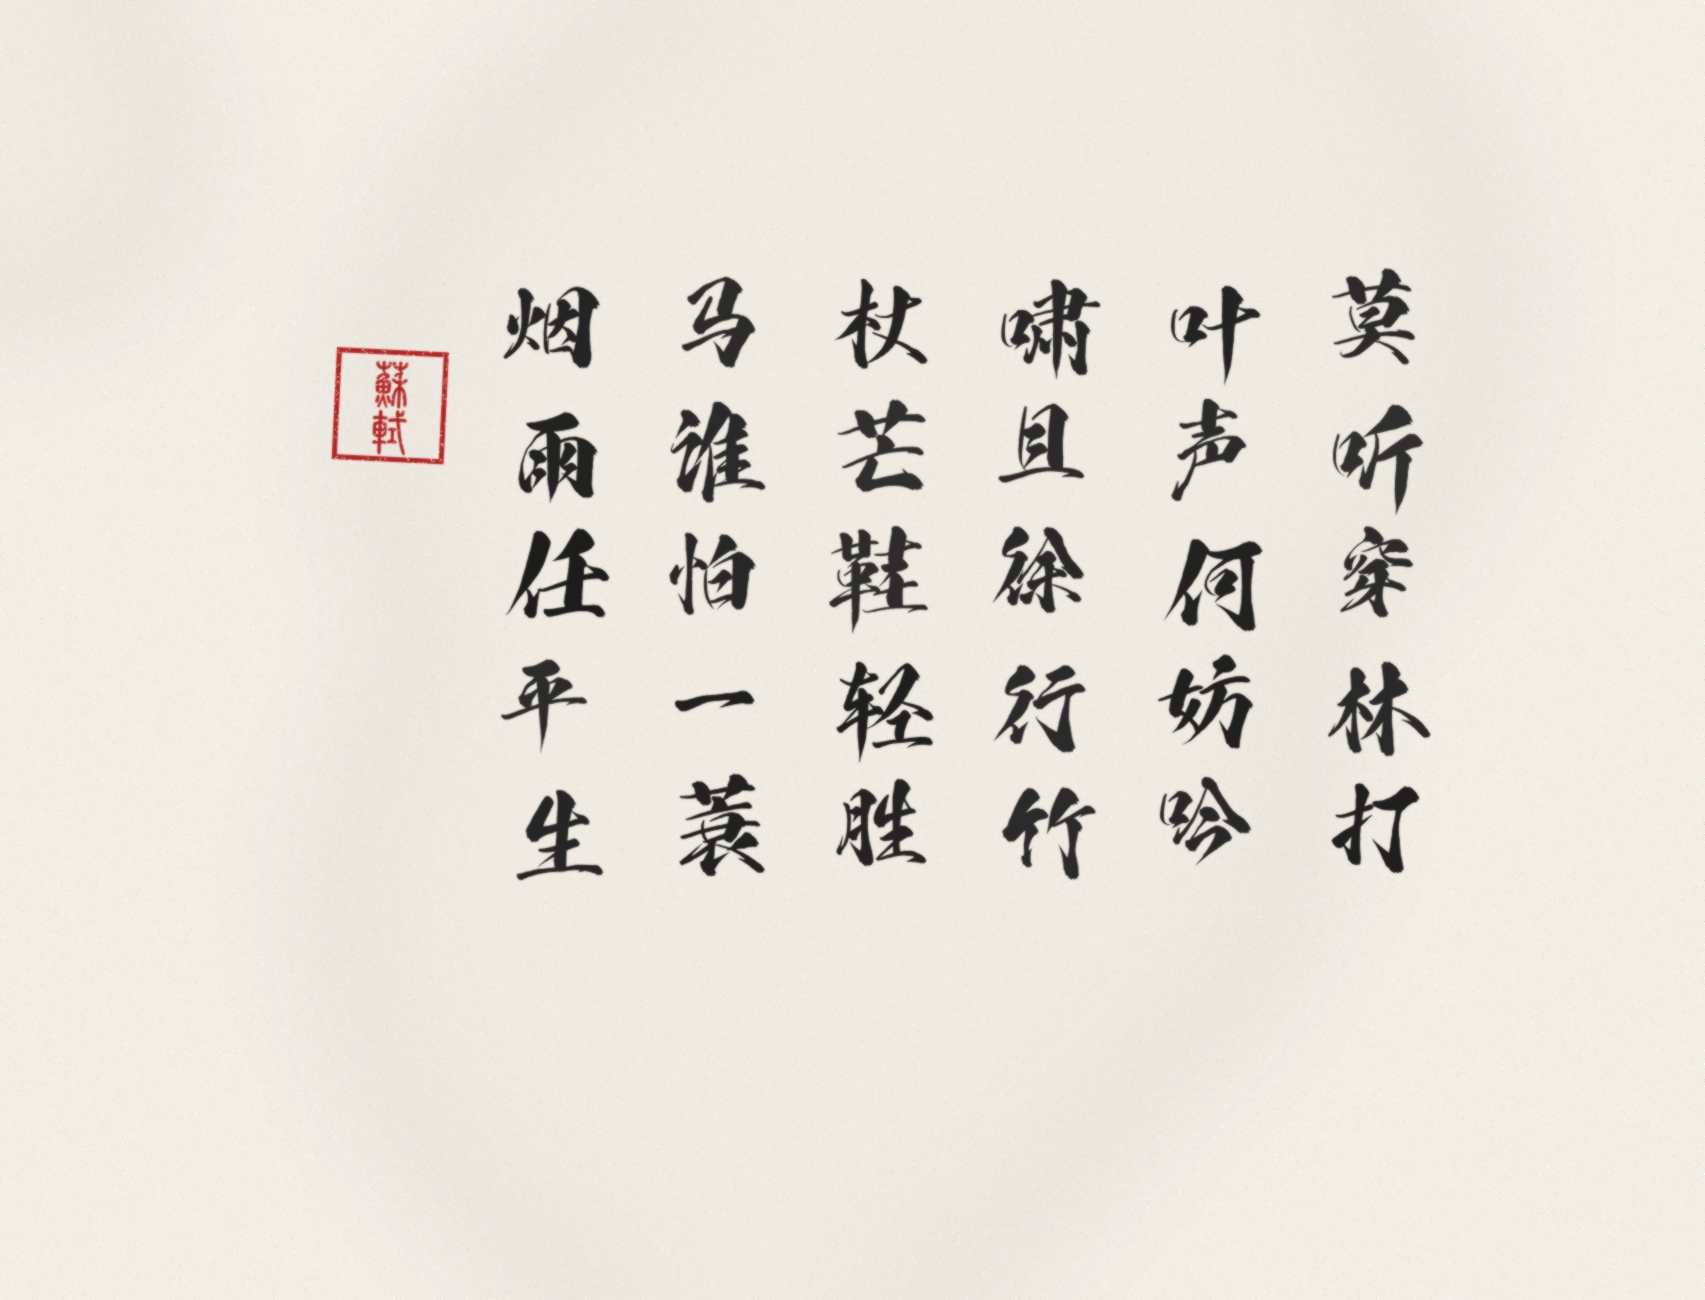
content = "莫听穿林打叶声何妨吟啸且徐行竹杖芒鞋轻胜马谁怕一蓑烟雨任平生"
seal_text = "蘇軾"
artist.generate(content, seal_text, base_font_size=110, output_file="su_shi_calligraphy.jpg")
|